3D Scanning A Clay Sculpture for Scaling and 3D printing
Photoscan Clay → Scale Art → Refine → Modify → Fabricate
Tradigital Sculpture: Clay Meets 3D CGI
As a tradigital sculptor, I fuse traditional clay techniques with digital tools to create my art. I decided to share this common workflow in my practice as of November 2025 for transforming clay sculpture (in this case a sitting monkey) into a scalable digital version of the sculpture—using only a smartphone and free software. I will show you how to to the same for your sculptures here. After reading this post, you will have a basic concept of how 3D scanning a clay sculpture using photogrammetry. will help your practice.
A "Tradigital" Process
This tradigital method combining traditional sculpture with digital 3D scanning solves important sculptural problems:
Digitizing physical sculptures (clay, stone, wood)
Enhancing them with digital tools (scaling, texturing, sculpting and morphing)
Re-materializing via 3D printing or CNC machining.
Why 3D Scanned Sculpture Is So Useful For Sculptors
Benefit | Impact for Artists |
|---|---|
| Preservation | Digitize the artwork before decay or damage to real life sculpture. |
| Scalability | Easily resize work to new sizes for digital fabrication. |
| Replication | 3D print or use CAM machine in plastic, resin, metal without having to take negative molds of the original sculpture for casting. |
| Sustainability | Fabricate sculptures on demand production that helps reduce waste. |
A Step By Step Workflow
Step-by-Step Tradigital Sculpture Workflow (Clay Monkey Sculpture Case Study)
In late October, I made a clay monkey sculpture with some 3D print elements embedded in the clay. A “tradigital” sculpture. Below is the process I used to 3D scan it then scale it. 3D scanning a clay sculpture using photogrammetry, is a great and affordable technique you will be able to start to try yourself after reading this post.
1. Prepare Your Traditional Sculpture
I used air dry clay for this sculpture because I didn’t have immediate access to a kiln at the time.
The sculpture was made on top of a potters wheel. On a part of my room with a white background. I took about 60 photos turning the wheel a few degrees each time, while holding the camera in place. Once the wheel rotated 360 degrees, I repeated the process at a higher or lower angle. Some recommend a black background. I find white works ok for me. I also didn’t spend too much time preparing the lighting. I find current photogrammetry technology is more forgiving than a few years back. As long at the room has fairly even diffuse lighting without a strong direct light, I usually find the final mesh turns out fine.
I sometimes add texture markers (white paint or black dots) onto the sculpture to improve the photogrammetry result. In this case I feel I didn’t really need to because it has an obvious solid shape.
2. Digitize with Smartphone Photo scanning
Tools: iPhone/Android + 3D Zephyr (alternative software available).
Technique:
Capture 60+ photos (80% overlap) in diffused natural light
Orbit at 3 heights (eye-level, 45° above, 45° below)
Use $20 turntable for perfect rotation
Pro Tip: Disable phone flash to avoid shadow. As of October 2025, there are other techniques out there such as Nerf capture. I find photogrammetry currently works best for my individual sculpture pieces..
3. Generate 3D Digital Model
Software:
- There are many software applications out there to make a mesh using photogrammetry from photos. I recently have been using a feature inside Adobe’s Substance Sampler. However, they have omitted this useful feature in new versions as of Autumn 2025.
Meshroom is favored by many. However, I find it can stall with the out of the box setting. I prefer the software 3D Zephyr really works well out of the box and it has a simple wizard. It is free if you use less than 50 images. You have to pay for over that but it does give a 30 days free trial for the paid version. I would recommend you to try it. It saved me a lot of time.
A quick watch of a Youtube tutorial like this one will get you started in no time. In not time you will be 3D Scanning A Clay Sculpture Using Photogrammetry.
After the mesh is complete in your photogrammetry app. Check to see the integrity of the mesh by orbitting around it. The export the mesh in a file format that is compatible with your 3D software. In my case I exported it as a .obj file.
- You then file>import the .obj file into your chosen 3D software to clean up the model and edit further and clean the model up. For example, deleting parts of the scan that go beyond the model itself.
- in my case I used Blender to fix holes, reduce polygons, optimize for printing
- I am also going to take it further by pushing around the form, smoothing it and adding more details using sculpt mode in Blender. You can see how the Mesh looks fairly decent already.
4. Prepare For 3D Printing Or CNC
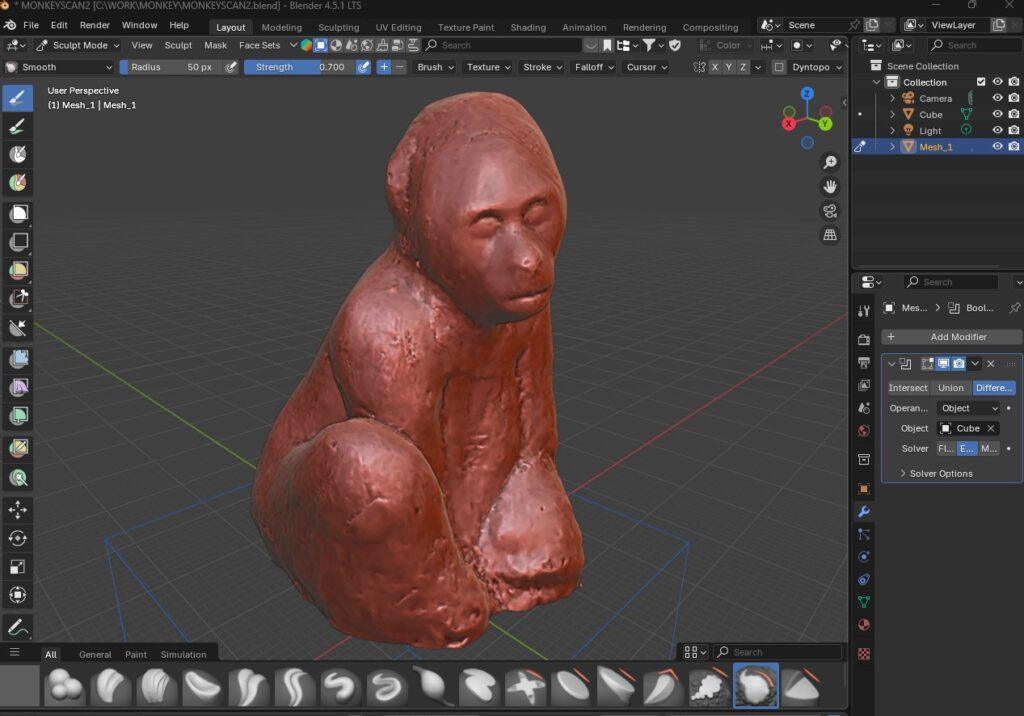
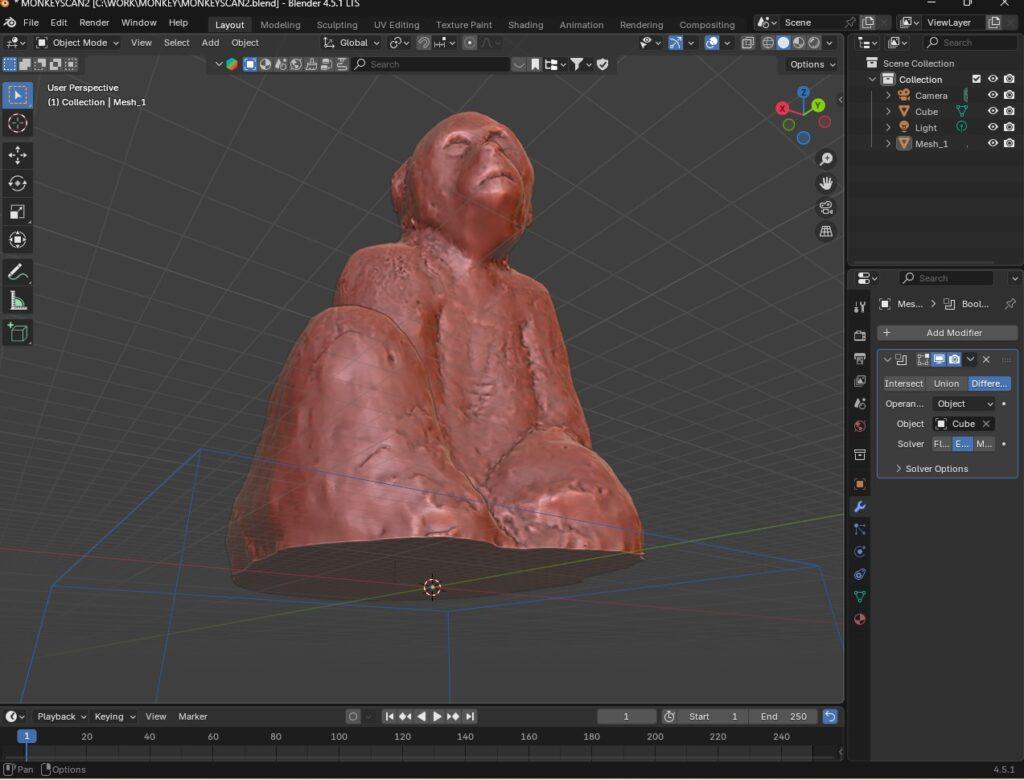
Once you have the digitized mesh using software like Blender gives you scope to scale, modify or change it. That way you can then get a new scaled or modified version back into real life using 3D printing or CAM techniques. It also allows for duplication without having to make a cast of the original.
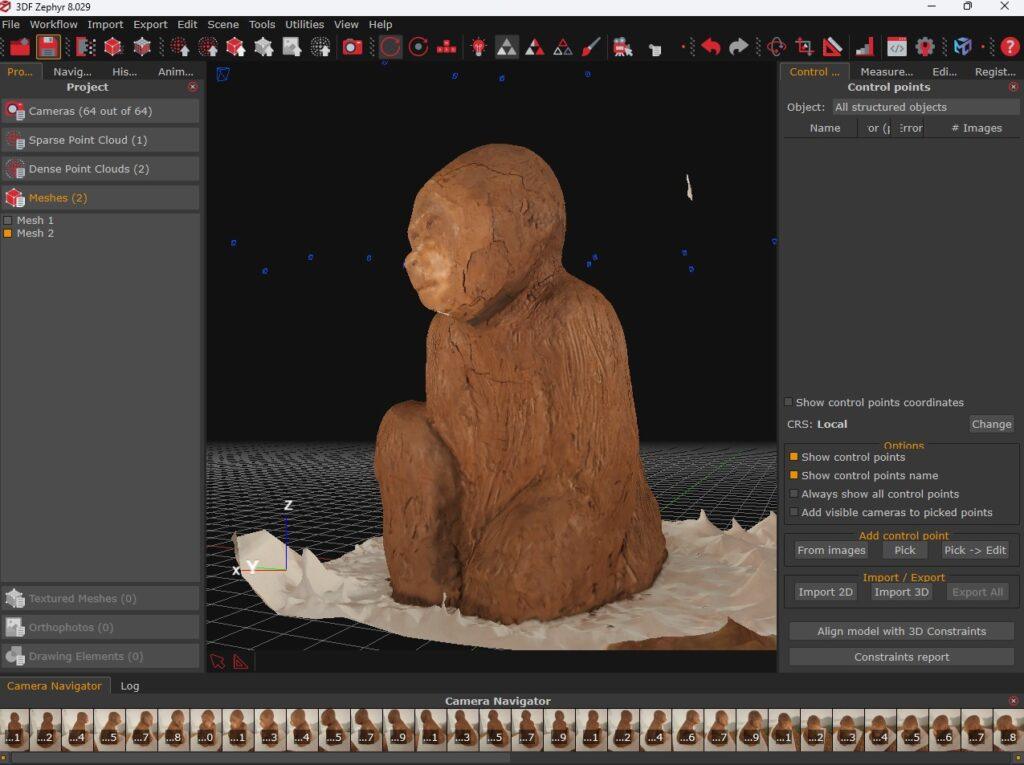
I wont go into the 3D print or CAM preparation process in this post. However, you can see the magic in being able to relatively easy get sculptures in real life into digital 3D space for a wide range of creative solutions.
The technology for this keeps getting better and now with AI tools such as Image to 3D, there are a lot of new exciting creative pathways to move along.
Why The Photogrammetry Process Is So Useful For Sculptors
Cost Efficiency: Replicate easily without always needing to make negative molds.
Creative Freedom: Power to evolve your original clay sculptures in 3D applications such as Blender using sculpting, poly modelling and modifiers.
Global Reach: Show your real sculptures interactively using Sketchfab or Three.js.
Artistic Legacy: Preserve your work forever in your digital archives or even display on the metaverse
Get More Help To Do This For Your Sculptures
If you found this blog useful and need more guidance, email me at info@jamesabellart.com to book a free no pressure one to one 30 minute trial. I can help you with the points below plus much more…
Smartphone photo scanning mastery (no expensive gear)
Blender workflow for professional 3D editing
3D printing secrets To improve your replicas
My monkey now exists as both a handmade sculpture and also digital asset artwork I think that is an awesome thing with unlimited possibilities.
Explore more of my art at www.jamesabellart.com.
Questions? Comment below
Related Resources & Tools Mentioned In This Post:
Resource Type | Links & Descriptions |
|---|---|
| Software | 3DZephyr – Good for making meshes from your smartphone photos app<br> Blender – For 3D editing, cleaning, sculpting and modifying <br> Ultimaker Cura – Good 3D slicing software |
| 3D Printers | Creality Ender 3 – Budget-friendly FDM workhorse<br> Anycubic Photon – Ultra-detailed resin printer |
H2: Stay Updated on Tradigital Innovations
Join my newsletter for exclusive content:
Subscribe to James Abell’s Newsletter
James Abell
[Follow on Instagram: @jamesabellart | #TradigitalSculpture #Clay


